Iris Colemak Keyboard Layout
- 1739 words
- 9 min
I use a split ortho/ergonomic mechanical keyboard, with the Colemak layout. It took considerable effort to switch to this setup in 2019, and I love it. Here I share details of the layout I landed on. If you have discomfort typing I hope you find this useful.
Why
I am a terrible QWERTY typist. I've spent decades typing with four fingers, glancing down at the keys and crossing over the centreline. My speed was fine but I would make frequent mistakes and typing was just uncomfortable.
I was starting to get wrist, shoulder and neck discomfort. Also as my eyes age, glancing and refocussing between screen and keyboard was becoming uncomfortable.
I had twice tried switching to a Dvorak layout on regular keyboards, and given up. I hate the horizontal staggering of the rows on regular keyboards, a holdover from threading levers between keys on mechanical typewriters, and that staggering messed with my brain while trying to learn a new layout. I don't want to bend my wrists to reach diagonally up and down the rows.
Goals
- Enjoy typing again: Clicky switches on sculpted keys in a comfortable layout.
- Proper touch typing: Stay in home position, no looking, correct fingers.
- Coding: Stay in home position for coding punctuation, avoid the top row.
- Navigation: Stay in home position for arrows, highlighting with arrows, etc.
- Minimise stretching: Use both hands when a modifier key is involved. Avoid the top row.
- Muscle memory: Keep familiar key locations for cut/copy/paste/undo.
- Maintain QWERTY so I can switch back to laptop keyboards when needed.
Result
All goals achieved. It's a delight to finally feel confident using a keyboard without glancing down at the keys. The only time I leave the home position is to reach for the mouse. My speed is about the same as what I previously managed with QWERTY, but with less mistakes. I easily switch between QWERTY on a standard keyboard and Colemak on my split ergonomic keyboard.
The transition took several months, and I'm very happy with my decision to learn Colemak at the same time as adapting to a new physical layout. If you're building new muscle memory anyway, you may as well.
Split ergonomic
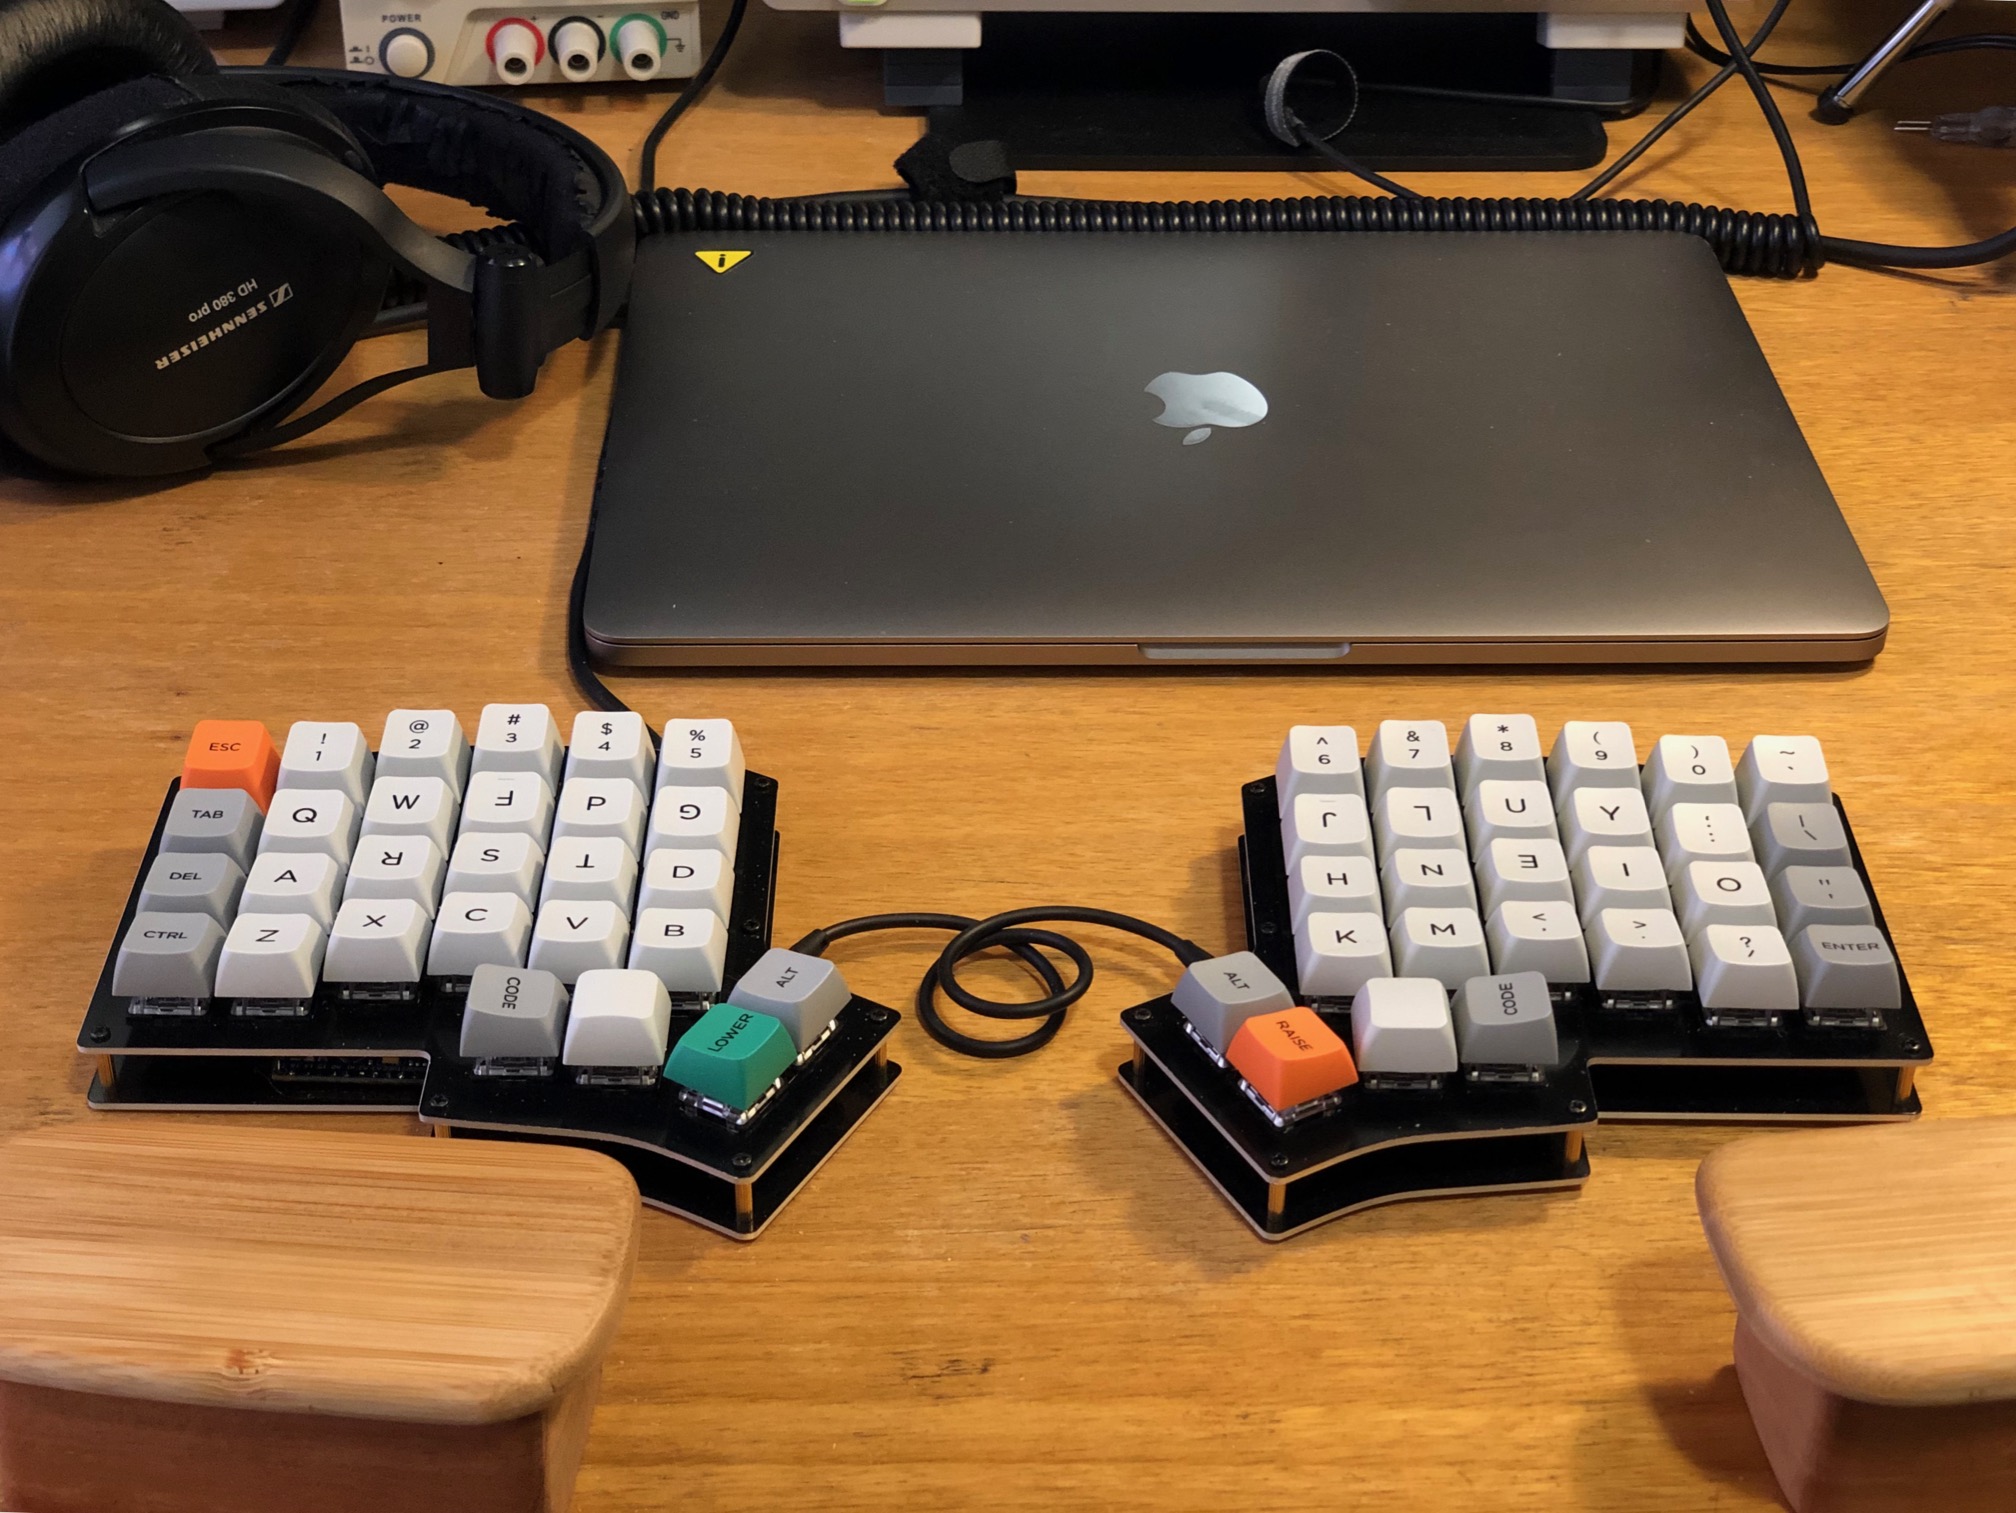
The keyboard pictured above is my Keebio Iris. The keys are arranged in vertical columns without the unhelpful horizontal stagger of standard keyboards. The columns are slightly staggered vertically, to accomodate the fact that my fingers are not all of the same length. I find this layout very comfortable.
Each half has a thumb cluster with three keys that are easily reachable and a fourth that I rarely use. Making good use of these thumb keys is critical to making the keyboard work well, and has taken a fair bit of experimentation. More on this below.
I use clicky Gateron Blue switches with MDA Big Bang caps. I love the tactile feedback and the sculpt of the caps, which give me confidence that my fingers are in the right place.
The photo above shows the caps in Colemak positions, some of them upside down to keep the keys sloping in the correct direction despite being in the wrong rows. I only did this while learning Colemak. It felt a little uneven but I was still in the habit of glancing down and I wanted to avoid confusing my brain about what letter was where. Now I have the caps in QWERTY locations but typing Colemak, so the cap label does not match what you get when you press the key. This is fine as I no longer look at the keys, and it has the benefit that I can switch to QWERTY mode when a visitor wants to try out the keyboard.
Layout
Keyboard layout editor can be a fun way to visualise a layout:

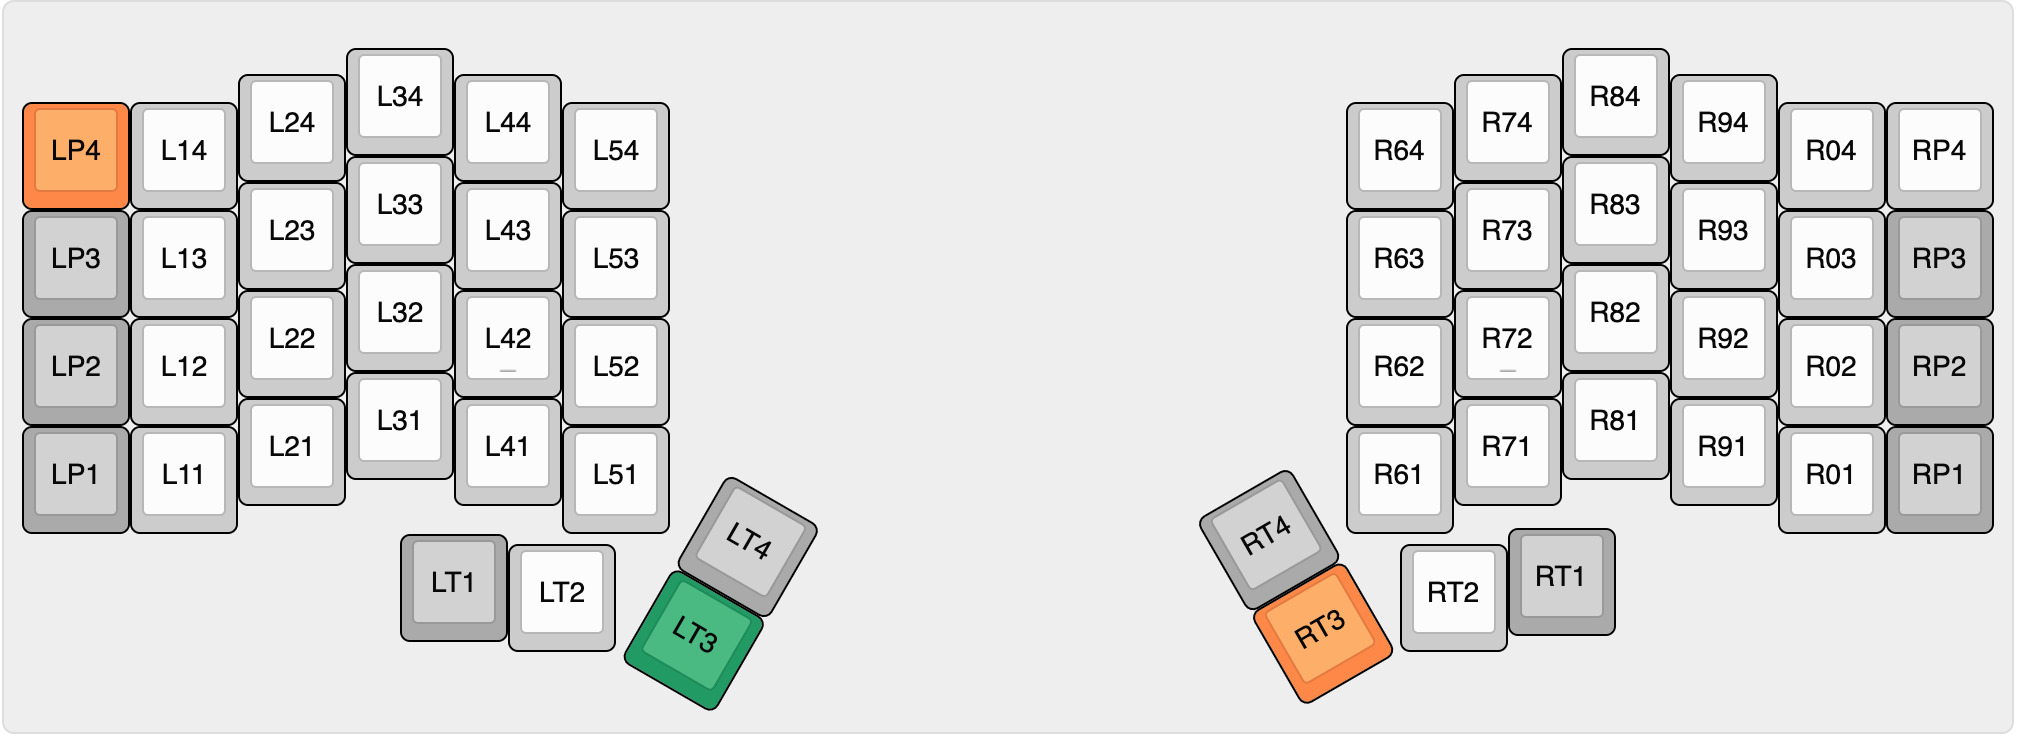
For talking about a layout it's useful to have a numbering scheme for the keys:
- LP: Left Pinky
- LT: Left Thumb
- RT: Right Thumb
- RP: Right Pinky
Thumbs and pinkies
Thumb keys are precious. I see people with layouts that use thumbs for enter, tab, backspace and even escape, and this makes no sense to me. I use my thumbs for space and modifier keys only.
Each thumb has three useful keys:
- A curl position LT1 / RT1
- A neutral position LT2 / RT2
- A stretch position LT3 / RT3
Being an ortho set, Big Bang MDA comes with lovely convex 1u space "bars". I use these as homing keys for my thumbs in the neutral positions LT2 and RT2.
- RT2 is my space bar. I found I was right-thumb dominant on space anyway, so using only one thumb for spaces frees up a precious thumb key.
- LT2 is a shift key. It takes a little getting used to but having shift under a thumb is glorious and makes so much more sense than stretching pinkies all the time.
- RP1 is a shift key when held and an enter key when tapped.
- LT1 and RT1 are command keys. It is worth having a command key under both thumbs so I can always use both hands, rather than stretching for an alpha key while the thumb of the same hand is anchored on the command key.
- LT3 and RT3 select the Raise and Lower layers, which provide punctuation, navigation and a numeric keypad without leaving the home positions.
Layers
For the purposes of designing and learning the layout I find it more clear to do away with the vertical stagger, and draw up separate tables for each layer. A simple grid is easier on the brain. This is the cheat sheet I have printed out and taped just below my monitor:
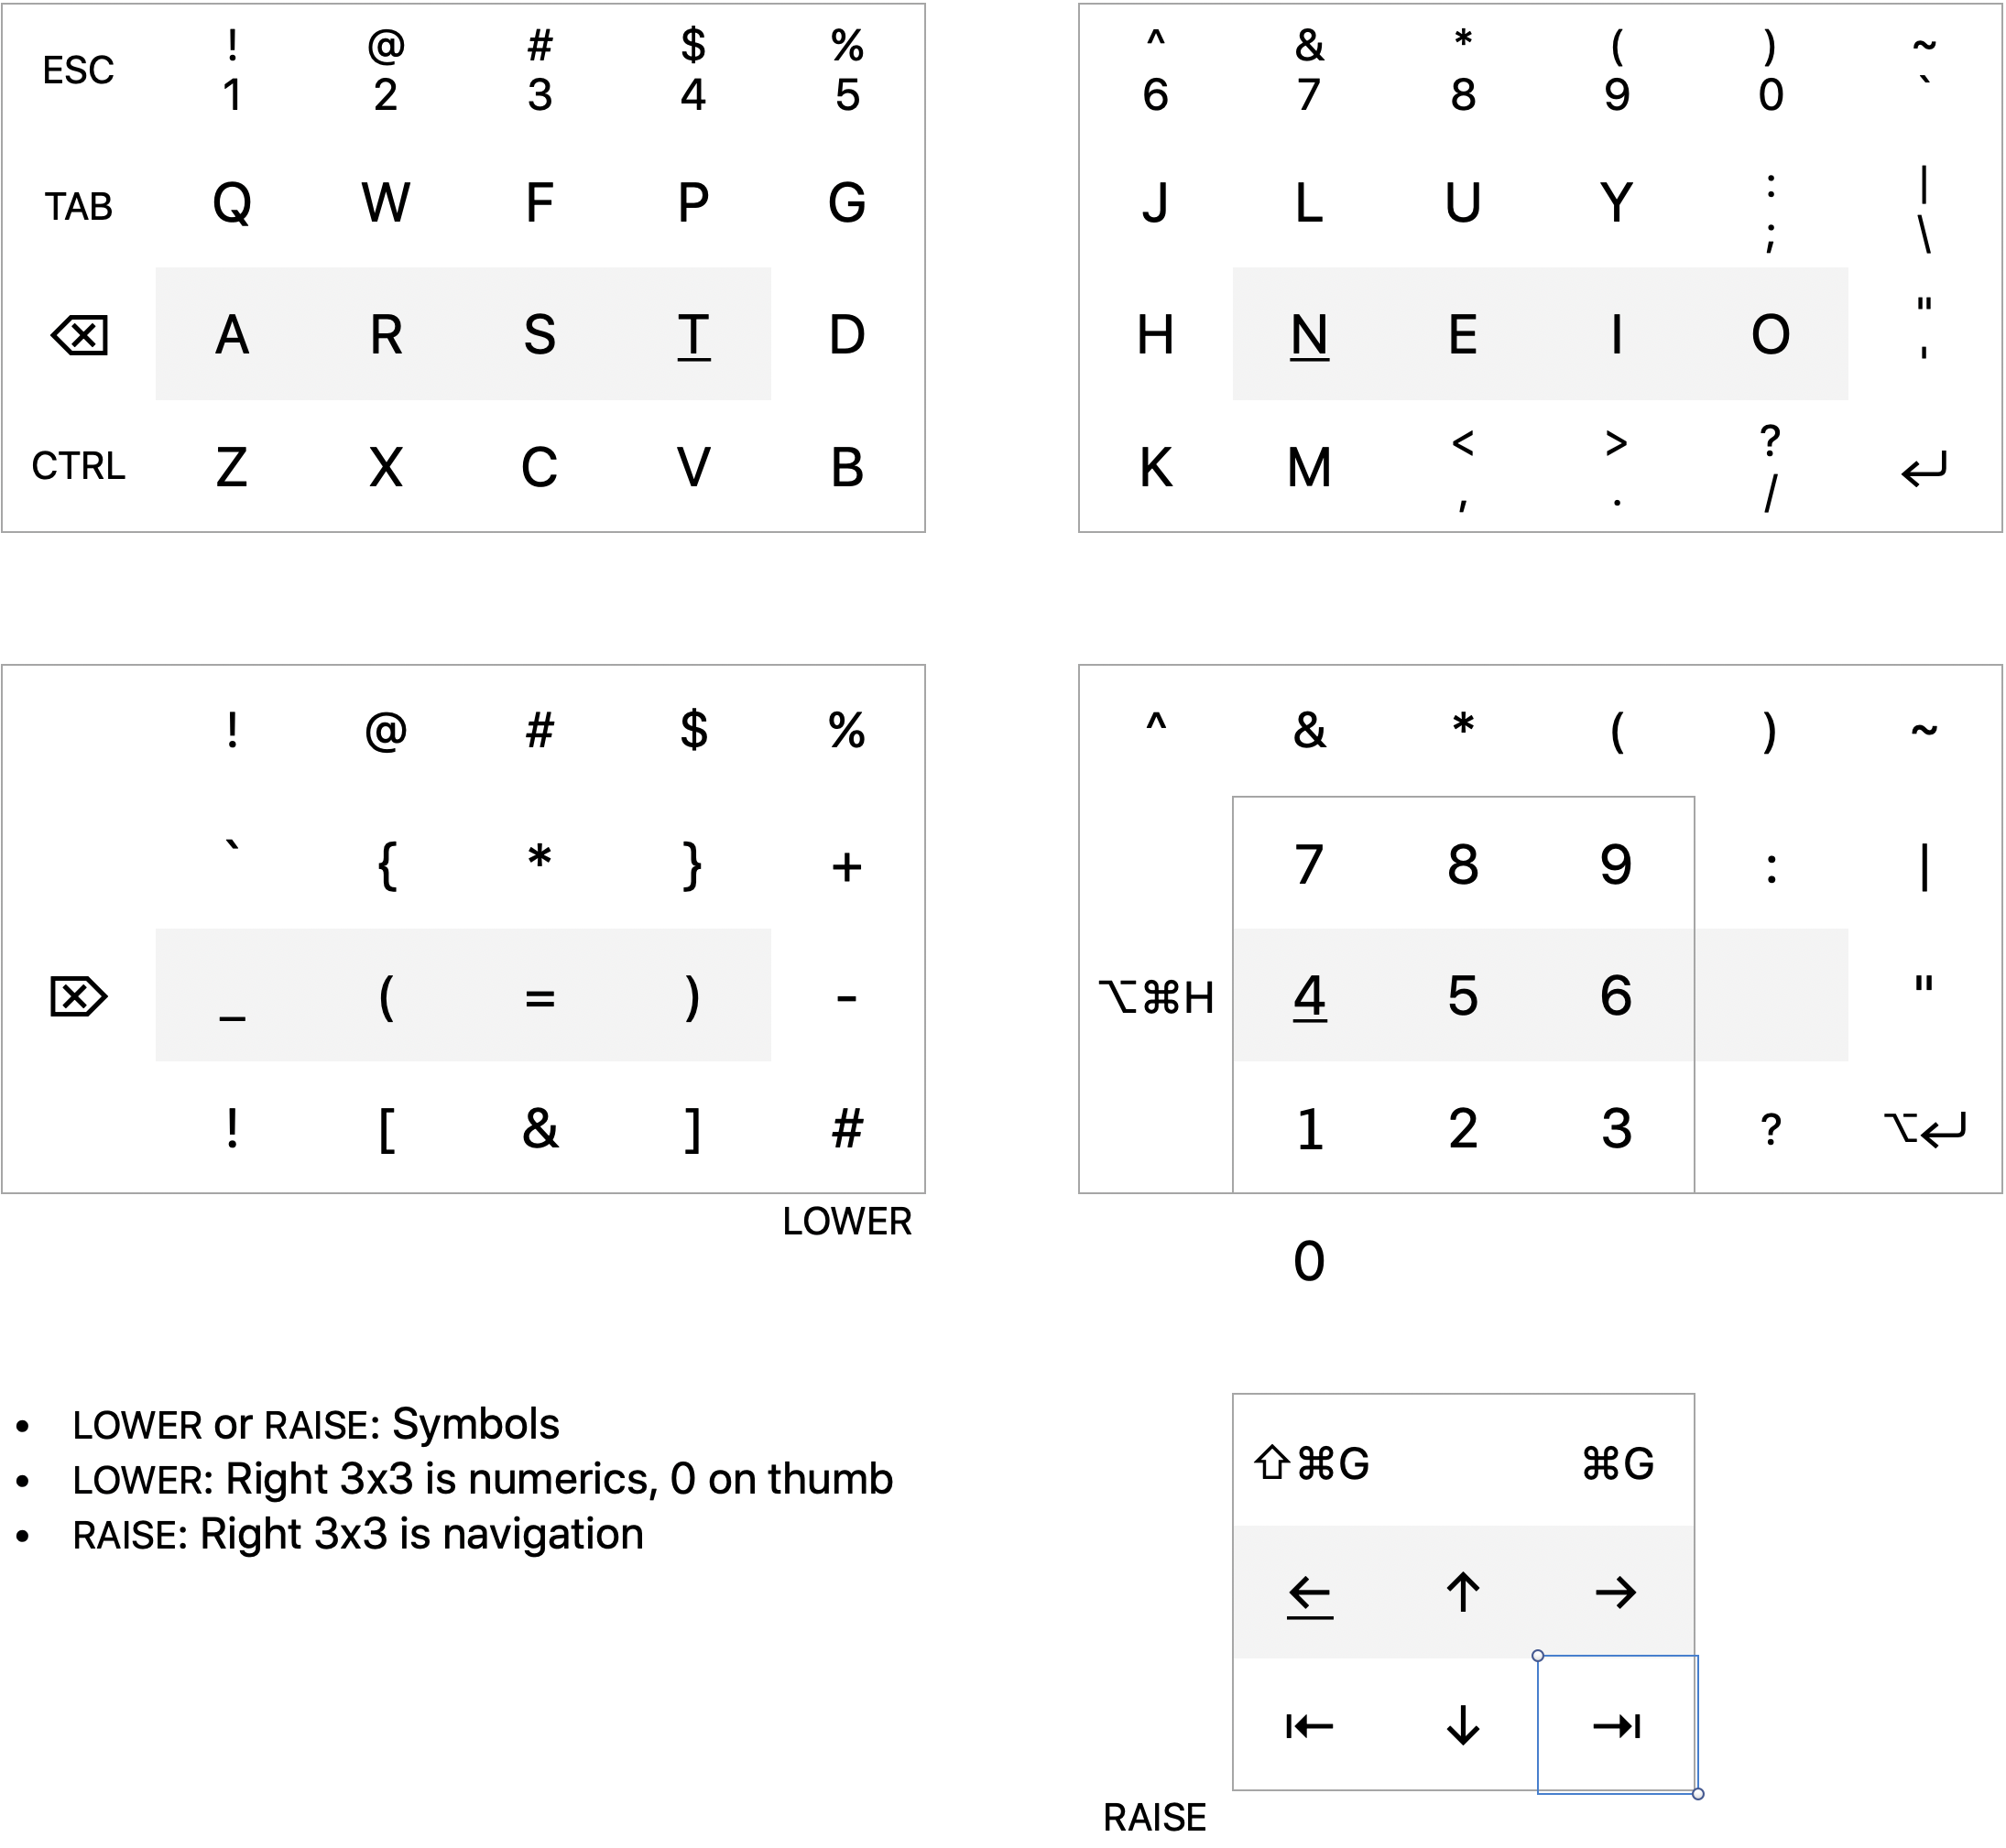
With the Lower key (LT3) held, a numeric keypad appears under my right hand, with the zero key under my right thumb (RT2). I use this all the time and almost never use the top-row numeric keys.
With the Raise key (RT3) held, an arrow key cluster appears under my right hand. I find it most comfortable to curl for the down arrow rather than stretching for the up arrow, so the left and right arrows are in the same row as the up arrow. Below those I have start-of-line and end-of-line keys. Above them I have search-previous and search-next keys. This lets me do all cursor navigation with my right hand, without leaving the home position. I can also comfortably select text by holding my LT2 shift key while navigating.
With either Lower or Raise held, symbol keys appear under the left hand. I like the symmetry of opening and closing parens, brackets and braces on either side of my left middle finger, and how this mirrors the 3x3 clusters of the numeric keypad and the navigation keys. This symmetry has made the layout easier to learn.
The remaining symbols are arranged to minimise movement between rows when I type common punctuation combinations in my preferred programming language, Rust. I wrote a small program to count character frequency in a typical corpus of my code, and positioned the most common symbols on the home row. I also maintained a brief representative code snippet that I would retype to test layout changes.
Failed experiments
I started with what I thought was a brilliant idea: LT2 and RT2 were both space when tapped and shift when held. I liked the symmetry, and thought this would work well. It was fine for a few weeks, until I was typing fast enough that I was still releasing the space key when starting to type a subsequent word. This would be interpreted as a shift-letter combo rather than a space followed by a letter, so I would get "typeFast" instead of "type fast". To resolve this I chose to dedicate LT2 as shift and RT2 as space, and found that RP1 could be a shared shift/enter key without problem. It is less aesthetically pleasing to have asymmetric shift keys, but it works well in practice.
Shortcomings
I love having a numeric keypad in the home position under my right hand on the Lower layer, including having the zero key under my right thumb in the neutral position - which also happens to be my space bar. The only downside is that sometimes when typing a number followed by a space I am too slow releasing the Lower key, and I will get "260letters" instead of "26 letters". This hasn't annoyed me enough to do anything about it, and I haven't found an alternative that I like better. Having the zero under my thumb in the numeric keypad is glorious and I don't want to give it up.
Recommendations
Make your goals explicit up front. Write them down. What will be improved by switching to a new keyboard layout? If you already touch-type QWERTY, or you write prose more than code, your goals and choices might be quite different from mine.
Take care in how you construct your layout to begin with. Every change to the layout means a period of unlearning and relearning. It is surprising how quickly we learn something that then takes time to unlearn.
Prioritise comfort and accuracy over speed. Slow down enough to avoid all mistakes before increasing speed, otherwise you end up just practicing the mistakes.
Prefer simplicity and familiarity. A smaller number of layers is easier to learn and faster to use.
Commit: Accept that there will be a period of much lower productivity in order to make this transition. Let people around you know, so that you have the support to stick with it rather than feeling the pressure to abandon the transition in order to return to full productivity.
Keep breathing. When I first made the switch it took me some time to figure out why typing Colemak I felt like I couldn't breathe. I was unaware of my breathing being synchronised to my typing, until my typing speed was suddenly so much slower I was running out of oxygen.